Have you ever felt that slight disappointment when slicing into a cake that looks perfect yet feels just a bit dry on the palate?
Good news: soaking syrup is that discreet little gesture that changes everything. This article will guide you step by step, gently and without stress, so you can master it with confidence.
Imagine a sponge cake becoming tender almost melt-in-the-mouth as it slowly absorbs a warm, delicately scented syrup, leaving a soft, comforting sensation with every bite.
Here’s a gentle knowledge bomb: a good soaking syrup never makes a cake soggy. It balances moisture and reveals flavours without masking the texture.
Throughout this article, you’ll discover:
Take a breath, set down your whisk, and let yourself be guided soaking syrup is a simple, sensory, and incredibly effective ally.
Soaking syrup is often seen as a small detail, yet it plays a fundamental role in a cake’s success. As soon as it touches the sponge still slightly warm it gently seeps into the crumb and transforms the texture. The cake becomes softer, more pleasant, almost alive under the knife.
What makes soaking syrup so valuable is its ability to hydrate without weighing the cake down. Unlike cream or ganache, it doesn’t alter the cake’s structure. It simply adds controlled moisture, extending freshness and enhancing the flavours already present.
When the syrup meets the cake, you may sense a soft sweetness and a subtle aroma rising gently. This is the precise moment when the cake begins to “drink” slowly, calmly. You’ll find this step surprisingly soothing, as it calls for patience and attention.
Soaking syrup is also a powerful tool for flavour balance. A chocolate sponge gains depth with a vanilla syrup, while a lemon cake becomes brighter with a lightly tangy one. Each pairing tells a different story.
To remember:
The classic soaking syrup recipe relies on a very simple balance: water and sugar. Nothing more. And yet, this basic combination can turn an ordinary cake into a moist, generous dessert.
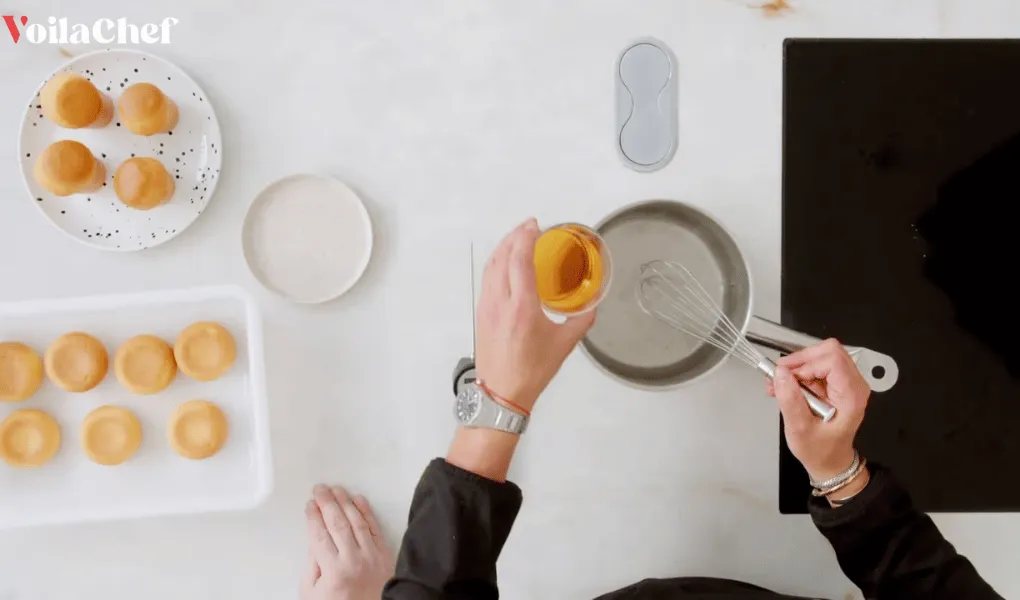
In a saucepan, the water heats gently. The sugar dissolves little by little, silently, creating a clear, almost glossy liquid. As the mixture begins to simmer, a clean, subtle sweetness rises discreet but reassuring.
Let it simmer briefly, just long enough for the sugar to dissolve completely. The syrup becomes smooth and free of crystals, ready to use. At this stage, remove it from the heat and allow it to cool to a warm temperature ideal for soaking.
This moment matters: syrup that’s too hot can weaken the cake, while cold syrup won’t penetrate as well. Warm syrup glides gently into the crumb and settles there delicately.
The classic ratio is one part water to one part sugar, but this can be adjusted. For a very dry cake, a slightly thinner syrup works better. For an already moist sponge, a lighter syrup is more than enough.
If you enjoy understanding these nuances, some online pastry courses offer very clear demonstrations that help refine your intuition.
Quick tips:
Once you’ve mastered the base, soaking syrup becomes a true sensory playground. This is where aromas, zests, and spices come into play turning something simple into something memorable.
Adding lemon zest to warm syrup releases a bright, almost sunny aroma instantly. The syrup becomes fragrant without turning acidic, bringing freshness to plain sponges or almond-based cakes.
Vanilla, on the other hand, adds a round, comforting warmth. A split vanilla bean infused for a few minutes wraps the syrup in a soft fragrance perfect for génoise, loaf cakes, or fruit desserts.
For more grown-up versions, a splash of rum, orange blossom water, or even coffee adds extra depth. The alcohol partially evaporates, leaving only a subtle aromatic note never overpowering.
The key is restraint. A soaking syrup should never steal the spotlight from the cake. It supports, enhances, and almost disappears once tasted.
Take a moment to smell the syrup before using it. This brief sensory pause helps you adjust quantities and create harmony between the sponge and its aroma.
Helpful tips:
Soaking a cake is simple, but it requires attention. The secret lies less in quantity than in application. It’s a quiet, almost silent moment where you watch the cake respond.
Using a pastry brush or spoon, apply the syrup gradually. You’ll see the surface darken slightly, a sign the sponge is absorbing it. There’s no need to pour everything at once. Small amounts, given time, work best.
A still-warm cake accepts syrup more easily. The liquid sinks in smoothly, creating an even texture. With a cold cake, you can add a bit more but always gently.
If the cake starts to look overly glossy or syrup pools on the surface, simply stop. Rest will do the rest. Within minutes, moisture redistributes naturally.
With practice, this gesture becomes instinctive. You learn to recognise the right moment, the right amount, and most importantly to trust your senses rather than strict rules.
In brief:
Soaking syrup is a small, gentle gesture that transforms a cake without ever overpowering it. By taking time to listen to textures and aromas, you’ll see each dessert gain softness and harmony. And if you feel like going further, exploring an online pastry course can be a wonderful source of inspiration always with pleasure at the heart of it.

Straight to your inbox, every week
Unlock the secrets of the greatest French pastry and bakery Chefs
Master advanced and expert techniques
A professional and detailed look at essential tools and ingredients