A fruit tart can be delicious… but without a glaze, it often lacks that inviting shine that catches the eye and makes you salivate before the first bite.
Good news: making a fruit tart glaze is much simpler than it looks, and this guide will walk you through it step by step with calm, precise instructions.
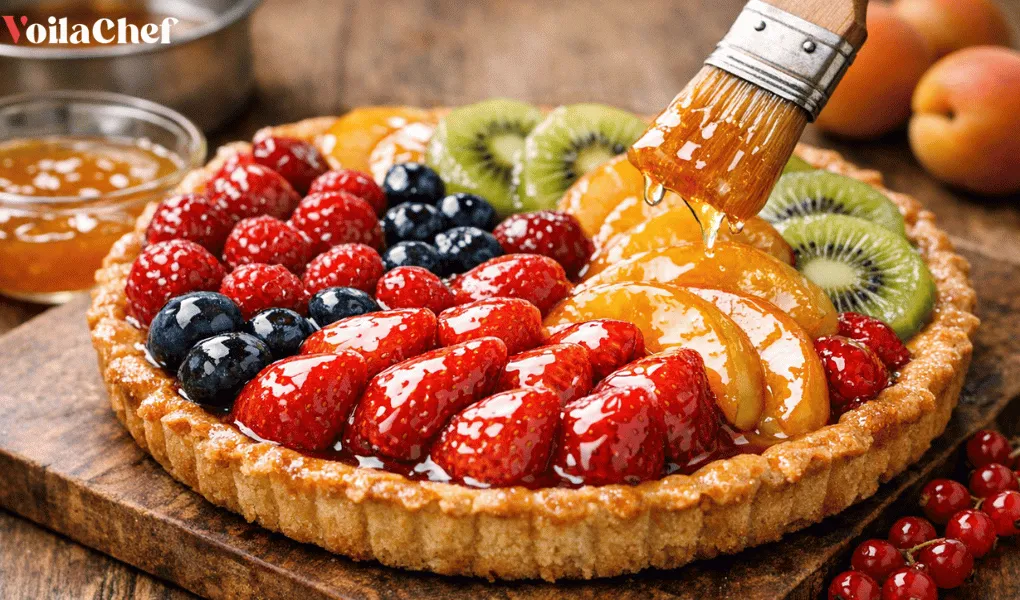
Imagine your fruit gleaming, almost varnished by the light, lightly polished with a thin, transparent film that protects freshness and makes natural colors pop. Strawberries look redder, apricots more golden, peaches almost satin-like.
A useful note: glaze isn’t just aesthetic. It also protects fruit from oxidation, preserves juiciness, and prevents drying in the fridge.
In this article, you’ll discover:
Take a moment, set your tart on the counter, observe it… and let yourself be guided to give it that gourmet, elegant finish that makes all the difference.
Glaze is not just decorative. As soon as you add it to a tart, you feel the visual cohesion and a true sense of finish. Fruit that can look a bit matte after baking or resting suddenly appears fresh and juicy like it was just picked.
Practically speaking, glaze acts as a thin protective barrier. It coats the fruit with a transparent layer that limits moisture loss. Result: strawberries stay tender, kiwis keep their shine, and apples don’t brown too quickly. A small step but it clearly extends your tart’s shelf life.
It also affects mouthfeel. A well-measured glaze adds a silky, almost melting sensation that links the fruits without masking their flavor. Too thick, it turns sticky. Too thin, it disappears. It’s all about balance and that’s exactly what you’ll learn to master.
In pastry displays, this uniform glaze is often what makes you stop and stare. It catches the light, highlights shapes, and makes the tart instantly more desirable. At home, you get the same effect: a homemade dessert that looks instantly more professional, without extreme effort.
To remember:
This is the most accessible method perfect when you’re starting out. It’s based on an ingredient you probably already have: jam. With gentle heat, it turns into a fluid glaze that beautifully elevates a fruit tart.
As the jam warms, its aroma rounds out and the texture loosens. Strain it through a fine sieve to remove fruit pieces and get a smooth, almost translucent liquid much nicer to apply. This simple step changes everything visually.
Now gently brush your fruit with a pastry brush. The glaze settles in a thin, even layer that hugs each slice. In seconds, the tart takes on that shiny, appetizing look we associate with pastry-shop desserts.
This method is highly adaptable. Apricot jam works with most fruits. Strawberry jam boosts red tones. Apple jelly is very neutral and discreet. Choose based on the effect you want always keeping it light.
If it feels too thick, add a trickle of hot water to loosen it. Too thin? Let it cool briefly and it will naturally thicken. Small, intuitive adjustments.
Quick tips:
If you want a more neutral, professional result, a homemade neutral glaze (water + sugar + gelling agent) is an excellent option. It doesn’t mask fruit flavor and delivers a very pure, almost crystalline shine.
Heat water and sugar until the mixture is clear and slightly syrupy. Add the gelling agent (e.g., sheet gelatin or pectin NH), which gives that special hold: neither too firm nor too fluid. The ideal texture looks like a glossy syrup that coats a spoon without running too fast.
Application is a pleasure: the glaze glides over the fruit, clings delicately to the surface, and sets within minutes into a thin, uniform layer. The result is elegant like polished glass especially on vividly colored fruit.
This type of neutral pastry glaze is perfect for tarts that will sit out longer (buffets, parties). It protects fruit effectively while staying light on the palate. You almost forget it when eating but it does all the backstage work.
Good to know:
A great glaze depends as much on application as on recipe. Keep movements gentle almost caressing so you don’t move the fruit or damage the surface. Take your time; neatness matters.
The glaze should be warm. Too hot and it runs excessively and can soften fruit. Too cold and it gets thick and hard to spread. The right temperature is easy to spot: the glaze slides slowly off the brush and forms a shiny film without dripping.
Always start from the center and move toward the edges. This natural motion ensures even distribution. The fruit gradually takes on a uniform look, as if covered by a fine, sweet dew.
Let the tart rest a few minutes after application. The glaze will set gently, revealing its full shine. Avoid touching the surface now let the magic happen. Once set, refrigerate without losing that gleam.
In short:
Making a fruit tart glaze is a simple, almost soothing gesture that instantly transforms your desserts. With a bit of attention and the right habits, your tarts gain shine, structure, and elegance. If you want to go further with finishes and textures, an online pastry class can gently enrich your practice.

Straight to your inbox, every week
Unlock the secrets of the greatest French pastry and bakery Chefs
Master advanced and expert techniques
A professional and detailed look at essential tools and ingredients